Guacamole 는 원격 데스크톱이나 VNC 등을 웹으로 사용할 수 있도록 해 주는 중계 프로그램입니다. HTML5 를 지원하는 브라우저만 있다면 어떤 시스템에서도 사용할 수 있고, Guacamole 가 설치된 서버에서 처리를 한 다음 중계를 해 주기 때문에 트래픽을 줄이고 반응 속도를 올려 안정적인 접속이 가능하다는 장점이 있습니다.
Guacamole 구조 이해
Guacamole 의 기본 구조는 아래와 같습니다.
VNC 서버 (윈도우나 리눅스 등) ↔ guacd ↔ tomcat guacamole ↔ 사용자의 웹 브라우저
VNC 나 SSH 서버 등에 guacd 가 접속해서 프로토콜을 변환해주고, tomcat 이 웹 서비스를 제공합니다. 사용자는 HTML5 의 기술 덕분에 웹으로 원격 컨트롤을 할 수 있습니다.
자세한 설명은 ‘아파치 과카몰레 – 구현 및 아키텍처‘ 를 참고하시길 바랍니다.
Guacamole 의 구성 요소로 Mysql 과 같은 SQL 서버를 포함하기도 하는데, 이는 mysql-auth 라는 mysql을 이용한 설정과 계정 관리를 하기 위한 확장 프로그램의 기능입니다. mysql 확장이 없어도 guacamole 는 훌륭하게 잘 작동합니다.
하지만 본 포스팅에서는 mysql 확장을 설치할 것입니다. 확장 없이 굴리면 불편하기 때문입니다. 예를 들어 접속 로그가 남지 않는다던가, 설정을 수정하기 위해선 설정 파일을 수정한 다음 tomcat 을 재시작해줘야 한다는 것 등입니다.
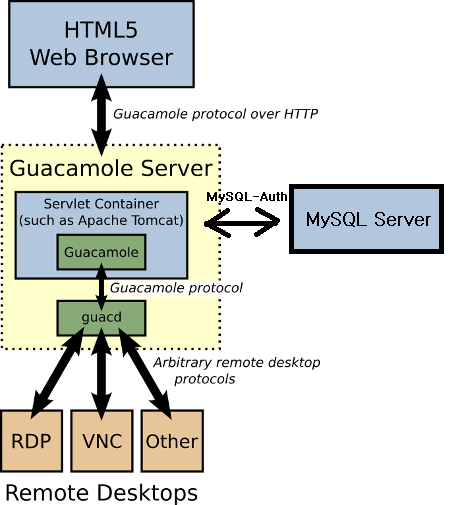
즉, 대충 이런 구조입니다.
Jail 만들기
Jail 의 이름은 Guacamole
자동 시작 설정 해 주세요.
Guacamole 설치
iocage console Guacamole
감옥에 로그인 해 주세요.
최신 레포로 바꾸기
‘PKG와 Port – 레포 바꾸기‘ 를 참고하여 레포를 최신으로 바꿔 줍니다
필요 패키지 설치
pkg install guacamole-client guacamole-server mysql-connector-java51 mariadb103-client bash
MySQL 데이터베이스 만들기
Guacamole 가 사용할 데이터베이스를 만들어야 합니다.
exit
Guacamole 감옥에서 나온 다음
iocage console MariaDB
MariaDB 감옥으로 로그인합니다.
mysql -u root -p
MariaDB로 로그인 한 후
CREATE DATABASE guacamoledb;
guacamoledb 라는 데이터베이스를 만들고
CREATE USER 'guacamole'@'Guacamole가 설치된 jail의 IP' IDENTIFIED BY 'superpowerstrowngpassword';
Guacamole 감옥에서 접근할 수 있는 guacamole 라는 유저가 superpowerstrowngpassword 라는 비밀번호를 가지도록 생성한 후
GRANT ALL privileges ON guacamoledb.* to 'guacamole'@'Guacamole가 설치된 jail의 IP';
해당 유저에게 guacamoledb 의 모든 권한을 주었습니다.
아파치 과카몰레 공식 페이지에서는 SELECT,INSERT,UPDATE,DELETE 권한만 주라고 하는데, 그것만 주니깐 에러나더라구요.
FLUSH PRIVILEGES;
권한을 업데이트하고
quit
MariaDB 콘솔에서 나가 줍니다.
exit
MariaDB 감옥에서 로그아웃 합니다.
MySQL Auth 확장 설치
iocage console Guacamole
Guacamole 감옥에 로그인 합니다.
cd /usr/local/share/guacamole-client
과카몰레의 확장 프로그램을 모아 둔 디렉토리로 이동합니다.
tar -xvzf guacamole-auth-jdbc.tar.gz
jdbc 확장의 압축을 헤재합니다.
cd guacamole-auth-jdbc-1.0.0/mysql/
압축을 풀어 나온 mysql 확장으로 이동합니다.
cat schema/*.sql | mysql -h MariaDB주소 -u guacamole -p guacamoledb
데이터베이스를 구성합니다.
비밀번호를 물어 볼 것인데, 비밀번호는 앞서 만든 데이터베이스의 비밀번호입니다. 이 경우 superpowerstrowngpassword 입니다.
mkdir /usr/local/etc/guacamole-client/extensions/
확장이 설치될 디렉토리를 만듭니다.
mv guacamole-auth-jdbc-mysql-1.0.0.jar /usr/local/etc/guacamole-client/extensions/
확장 프로그램을 이동합니다. (설치합니다.)
rm -r /usr/local/share/guacamole-client/guacamole-auth-jdbc-1.0.0/
정리 해 줍니다.
java-mysql-connection 설치
tomcat 이 mysql (또는 mariadb)를 다룰 수 있도록 mysql 커넥터를 설치하여야 합니다.
ln -s /usr/local/share/java/classes/mysql-connector-java.jar /usr/local/apache-tomcat-9.0/lib/mysql-connector-java.jar
mysql-connector-java 를 tomcat 의 라이브러리에 심볼릭 링크로 연결하였습니다.
Guacamole 설정
Guacamole 가 mysql 인증을 사용하도록 설정하여야 합니다.
cd /usr/local/etc/guacamole-client/
Guacamole 설정 디렉토리로 이동하고
cp guacamole.properties.sample guacamole.properties
예제 설정 파일을 복사합니다.
vi guacamole.properties
guacd-host: localhost
guacd-port: 4822

auth-provider: net.sourceforge.guacamole.net.auth.mysql.MySQLAuthenticationProvider

mysql-hostname: SQL서버 이름
mysql-port: SQL 서버 포트 (일반적으로 3306)
mysql-database: 데이터베이스 이름
mysql-username: 데이터베이스 유저 이름
mysql-password: 비밀번호
위와 같이 설정 파일을 작성해 주세요.
chown www:www guacamole.properties
chmod 400 guacamole.properties
guacamole 만 설정 파일에 접근할 수 있도록 권한을 설정해줍니다.
RealIP 받아오기 설정
Nginx 리버스 프록시를 통해 Guacamole 와 연결하게 되면 https 보안 통신으로 Guacamole 와 통신할 수 있습니다. 허나 그 경우 tomcat 에는 nginx 의 IP 만 찍히게 됨으로, 실제 IP를 받아 오기 위한 설정을 하도록 하겠습니다.
<Valve className="org.apache.catalina.valves.RemoteIpValve"
       internalProxies="Nginx_Reverse_proxy_ip"
       remoteIpHeader="x-forwarded-for"
       remoteIpProxiesHeader="x-forwarded-by"
       protocolHeader="x-forwarded-proto" />
이 코드는 tomcat 에서 RealIP를 받아 오기 위한 설정입니다. 위 코드의 ‘Nginx_Reverse_proxy_ip‘ 부분을 리버스 프록시의 IP 로 바꾸고 아래 예시와 같이 tomcat 의 설정 파일에 삽입해 주세요.
vi /usr/local/apache-tomcat-9.0/conf/server.xml
<!-- 생략 -->
        <Valve className="org.apache.catalina.valves.RemoteIpValve"
               internalProxies="Nginx_Reverse_proxy_ip"
               remoteIpHeader="x-forwarded-for"
               remoteIpProxiesHeader="x-forwarded-by"
               protocolHeader="x-forwarded-proto" />
      </Host>
    </Engine>
  </Service>
</Server>
이제 nginx 로 리버스 프록싱을 했을 때에도 IP가 정상적으로 찍힐 것입니다.
Guacamole 시작
sysrc tomcat9_enable="YES"
sysrc guacd_enable="YES"
tomcat 과 guacd 가 자동 실행되도록 서비스에 등록하였습니다.
service guacd start && service tomcat9 start
guacd와 tomcat을 시작하였습니다.
리버스 프록시 연결
exit
Guacamole 감옥에서 나가 주시고
iocage console Nginx_WAF
Nginx 리버스 프록시 감옥에 로그인 합니다.
tomcat 은 에러가 날 경우 에러 페이지를 너무 상세하게 띄웁니다. tomcat 에서 에러 메세지를 표시하지 않게 설정하는 방법이 있긴 합니다만, 문제가 좀 있어서 tomcat 에서 에러 발생시 Nginx 에서 에러 페이지를 보여주도록 하겠습니다.
mkdir -p /usr/local/www/errorpage/
에러 페이지를 저장할 디렉토리를 만들어주고
vi /usr/local/www/errorpage/error.html
에러 페이지를 작성해 줍니다.
<html>
    <head>
        <title>Error</title>
    </head>
    <body>Error</body>
</html>
텅 빈 페이지에 Error 라는 글자만 툭 띄워주는 HTML 문서입니다.
vi /usr/local/etc/nginx/conf.d/guacamole.conf
Guacamole 서버 블록을 만듭니다.
server {
    listen       443 ssl http2;
    server_name  guaca.example.com;
    root /noextend;

    include options/*;

    proxy_intercept_errors on;
    #tomcat에서 에러 코드 발생 시 nginx 에서 에러 메세지 표시

    error_page 401 403 404 =404 /error.html;

    location = /error.html {
        root /usr/local/www/errorpage/;
        internal;
    }

    location /remote/ {
        proxy_intercept_errors on;

        proxy_set_header Upgrade $http_upgrade;
        proxy_pass http://192.168.1.14:8080/guacamole/;
        proxy_cookie_path /guacamole/ /remote/;
        include otherconf/proxy.conf;
        proxy_set_header Connection $http_connection;

        location /remote/api/ {
            proxy_intercept_errors off;
            #api 부분은 nginx가 에러 메세지 표시를 할 시 오류가 발생해서 off.
            proxy_set_header Upgrade $http_upgrade;
            proxy_pass http://192.168.1.14:8080/guacamole/api/;
            proxy_cookie_path /guacamole/ /remote/;
            include otherconf/proxy.conf;
            proxy_set_header Connection $http_connection;
        }
    }
}
proxy_intercept_errors on; 백엔드 서버에서 에러를 표시하면 Nginx 에서 처리합니다. 단, /api/ 는 nginx 가 에러를 처리할 경우 오류가 나는 것을 확인하여 proxy_intercept_errors 을 off 하여 tomcat 에서 오류를 처리하도록 하였습니다.
접속
https://guaca.example.com/remote/ 로 접속하면 로그인 페이지가 나타납니다.
초기 아이디와 비밀번호는 guacadmin 입니다.
로그인 후 새로운 관리자 계정을 만들고 초기 계정인 guacadmin 계정은 삭제하는 것이 좋습니다.
새로운 연결 (vnc와 같은)을 만들 때에는 새로운 그룹 (newgroup) 을 만들어 주고, newgroup 아래에 vnc연결 등을 만들어 주어야 합니다. 만약 연결을 최상단에 만들 시, 로그인 하는 즉시 해당 연결로 접속하게 됩니다.
업데이트
업데이트 시에는 pkg update && pkg upgrade 로 패키지를 먼저 업데이트 한 후, guacamole 의 mysql 인증 확장 프로그램을 업데이트 해 주면 됩니다.
MySQL 확장을 업데이트 하는 과정은 JDBC 확장 프로그램의 압축을 풀고, MYSQL 확장을 Guacamole 확장 디렉토리로 복사한 다음, 데이터베이스를 업데이트 하고, 생성된 파일을 정리해주면 됩니다.
이 과정을 일일히 입력하는 건 귀찮음으로 업데이트 버전이 있는지 체크하고, 있다면 업데이트 하는 스크립트를 간단하게 짜 보도록 하겠습니다.
vi /root/update.sh
#!/usr/local/bin/bash

extension_dir=/usr/local/etc/guacamole-client/extensions
repo_dir=/usr/local/share/guacamole-client

new_version_dir_loc=`tar tvf $repo_dir/guacamole-auth-jdbc.tar.gz | grep ^d | head -1 | awk '{printf $9}'`

old_version=`ls $extension_dir/ | grep 'guacamole-auth-jdbc-mysql*' | sed 's/[^0-9]//g'`
new_version=`echo $new_version_dir_loc |sed 's/[^0-9]//g'`

if [[ -z $new_version ]]; then
        echo "error!!"
elif [[ $new_version -eq old_version ]]; then
        echo "Already the latest version. Do not update."
elif [[ $new_version -ne old_version ]]; then
        tar xvzf $repo_dir/guacamole-auth-jdbc.tar.gz -C $repo_dir
        rm $extension_dir/guacamole-auth-jdbc-mysql*
        cp $repo_dir/"${new_version_dir_loc}"mysql/guacamole-auth-jdbc-mysql-* $extension_dir/
        cat $repo_dir/"${new_version_dir_loc}"mysql/schema/*.sql | mysql -h MariaDB주소 -u guacamole -p guacamoledb
        rm -r $repo_dir/"${new_version_dir_loc}"
else
        echo "error!!!"
fi
완벽하다고는 말할 수 없지만, 적어도 돌아가긴 합니다.
chmod 550 /root/update.sh
스크립트를 실행 가능하도록 만들어었습니다.
업데이트 시에는
service guacd stop && service tomcat9 stop && pkg update && pkg upgrade && /root/update.sh && service guacd start && service tomcat9 start
를 입력해 주면 됩니다.
마치면서
Guacamole 와 Mysql 확장을 설치하고 리버스 프록시에 연결까지 하였습니다.
다음 포스팅에서는 JDownloader 를 다룰 것입니다. 제가 제일 선호하는 다운로드 프로그램이죠.
참고한 페이지
https://guacamole.apache.org/doc/gug/ #Guacamole 공식 메뉴얼 페이지